Apply with Scoir
Applicant resources
For Students: How to Apply Coalition with Scoir
Transfer & Non-Scoir Students: How many recommendations do I need?
Transfer & Non-Scoir Students: Requesting transcripts, application documents, & recommendations
Transfer & Non-Scoir Students: My recommendation was submitted but the college portal says it’s not received
Transfer & Non-Scoir Students: I added my recommender as "Other" and can't assign their letter to a college
Transfer & Non-Scoir Students: My recommender or school official can’t access their submission link or didn't get an email
Colleges resources
For Colleges: Scoir application activation checklist
For Colleges: Configuring your application
For Colleges: Application activation
For Colleges: Importing School Reference IDs
For Colleges: Testing your application
Recommender & supporter resources
Common App™ in Scoir
For Counselors & School Staff
Common App in Scoir: Start Here for Counselors
Getting Your School Ready for the Common App Integration
Sending Documents to Common App: How It Works
Managing Fee Waivers for Common App
Managing Common App Early Decision (ED) Agreements
Creating Midyear Reports for Common App
Creating Optional Reports for Common App
Creating Final Reports for Common App
Sending Documents for Alumni with the Common App Integration
For Students
Common App in Scoir: Start Here for Students
Connecting Common App & Scoir
How to Sign your FERPA in Common App
Requesting Fee Waivers for Common App
Completing an Early Decision (ED) Agreement for Common App
Using Scoir & Common App if Your School Doesn't Connect Them
Troubleshooting Common App Account Linking
Troubleshooting FERPA Status in Scoir
What Syncs Between Common App & Scoir
Changing a College’s Application Method
Common App System Refresh: What to Expect in Scoir
Counselors
Getting started
Using Scoir: A quick start guide for middle school counselors
For Counselors: Managing your account
Counselor Dashboard Overview
For Counselors/Teachers: Changing your email address
For Counselors: Creating a Demo Student Account
Adding & managing students
For Counselors: Student roster overview
For Counselors: Add a new student
For Counselors: Student registration process
For Counselors: Labels overview
For Counselors: My student has a Scoir account but I can't see their data
For Counselors: Edit student profiles
For Counselors: Student transferring high schools
For Counselors: How to Find and Restore Archived Students
Counselors: Recording Scholarships for Students
For Counselors: Create and manage Saved Views
Managing parents
Why can't parents see Scattergrams, Surveys, and other Scoir features?
For Counselors: Using the Parent Roster
Counselors: Why can’t I add a parent to a student’s account?
College & career planning
For Counselors: Viewing students’ career interests
Counselors: PrinciplesYou character assessment overview
For Counselors: Searching and filtering colleges
For Counselors: Suggesting colleges
For Counselors: Add a college to a student's college list
For Counselors: Manage colleges on behalf of a student
For Counselors: Managing and using Scattergrams
For Counselors: Understanding List Scores
For Counselors: A guide to Predictive Chances with Scoir AI
For Counselors: Guide to Acceptance Likelihood and Intelligent Match
For Counselors: Set student outcomes and post-graduate plans
For Counselors: Applications Overview
For Counselors: Admission Intelligence FAQ
For Counselors: Adding a college that isn't showing up in Scoir
Document management
School Drive & student Drives
Choosing the right way to share resources with students
For Counselors: Using School Drive
For Counselors: View and manage your student's Drive
For Counselors: Bulk add files & links to students' Drives
Document preparation & uploading
Counselors: Create a Secondary School Report for Individual Students
Counselors: Midyear Reports and Transcripts
For Counselors: Final Reports and Transcripts
For Counselors: Grade Reports (Individual)
For Counselors: Application Fee Waivers
For Counselors: Digitally Signing Early Decision Contracts/Agreements
For Counselors: A Guide to Letters of Recommendation in Scoir
Counselors: Complete a counselor evaluation/recommendation
Counselors: Checking the status of teacher recommendation requests
Counselors: Ranking a Student's Recommendations
Assigning Recommendations to Colleges
Counselors: Uploading recommendations on Behalf of Others
For Counselors: Managing FERPA on behalf of a student
Understanding FERPA - Frequently asked questions
For Counselors: Manage Documents
Document sending
Counselors: Bulk Sending Application Documents
For Counselors: Sending Application Documents for Individual Students
For Counselors: Understanding what "Complete Packets Ready to Send" means
For Counselors: Understanding the "Needs Attention" document status
For Counselors: Cancel sent documents - the send docs "undo" button 😮
For Counselors: Resending an updated transcript after it was already sent
For Counselors: Why aren't documents appearing in the list to be sent to colleges?
Tracking & troubleshooting
Plans, Tasks, and Forms
For Counselors: Creating and Managing Assignment Plans
Counselors: Creating and Assigning Forms
Counselors: Creating and Assigning Tasks
For Counselors: Creating, publishing, and editing Surveys
For Counselors: Viewing Survey results
For Counselors: Creating brag sheets in Scoir
Counselors: Scoir-Created Plans Playbook
Uploading test scores & other data
Test Score Imports: ACT score imports
Test Score Imports: ACT and PreACT scores via rapid manual entry
Uploading College Board test scores
For Counselors: Importing Custom Properties
Bulk add/update Grade Report
Bulk add/update Senior Courses
Bulk add/update Student GPAs
Bulk add/update Transcripts
Reporting
For Counselors: Running reports on student data
For Counselors: Custom Properties and Property Groups
Communication & notifications
For Counselors: Messaging students & parents in Scoir
For Counselors: The Email Center
For Counselors: Sending and scheduling emails
For Counselors: Emailing users using the advanced email integration
For Counselors: Scoir Library & Email Subscription management
For Counselors: What notifications will students receive from Scoir?
For Counselors: Notifications & alerts
Calendar & scheduling
Using the calendar
For Counselors: Calendar overview
For Counselors: Linking your Scoir calendar to an external calendar
Visits & office hours
For Counselors: Scheduling in-person visits & availability
For Counselors: Scheduling virtual visits
For Counselors: Scheduling visits for non-college organizations
For Counselors: Scheduling multiple college visits within the same time slot
For Counselors: Students' notification of college visits
For Counselors: Understanding Scoir RSVP dates
For Counselors: Scheduling office hours
For Counselors: Office hours from the student perspective
For Counselors: Edit or delete a visit
Resources & checklists
Students
Account setup & management
Students: Getting Started with Your Scoir Dashboard
For Students: Creating an account when invited by your high school
For Students: Creating an account on your own (non-Scoir high school student account)
For Students: How to tell if you are linked to a high school or not
For Students: Invite a parent or guardian to Scoir
For Students: What to do if you have multiple accounts
Students: Link your existing Scoir account to a high school
Students: How to Add an Alternate Email or Change Your Primary Email
For Students: Delete your account
Build your student profile
For Students: Updating Your Personal Information in Scoir
For Students: First generation students
Students: How to Access and Sign Your FERPA in Scoir
For Students: Edit Your Academic Info (School, GPA, and Test Scores)
For Students: Record Your Activities and Achievements
For Students: Create and Export a Resume in Scoir
For Students: Using your Drive
Explore careers
For Students: Taking a career interest assessment
For Students: Taking the PrinciplesYou character assessment
For Students: Discover careers
For Students: Managing careers in your profile
For Students & Parents: Access College Guidance Network with single sign-on (SSO)
College planning
Explore colleges
For Students: Setting your college preferences
For Students: Student interest categories
For Students: Discover colleges
For Students: College profiles
For Students: Comparing colleges
For Students: Viewing Scattergrams
For Students: Discover Events
For Students: Discover Programs
Build & manage your college list
For Students: Understanding what it means to follow a college in Scoir
For Students: My Colleges
For Students: View your college list in a table layout
For Students & Parents: Create and Manage Views
The Balanced List Score
For Students: View & simulate your Predictive Chances for college admissions
For Students: Updating outcomes and post graduate plans
Application documents & resources
For Students: Understanding Test Optional, Test Free & Test Required SAT/ACT Scores
Students: Requesting Application Fee Waivers in Scoir
For Students: Early Decision Contracts in Scoir
For Scoir connected students: Requesting transcripts
Students: Requesting Teacher Recommendations if Your School Uses Scoir
For Students: Checklist for ensuring application document delivery
For Students: How to Request and Rank Recommendations
Assignments
Office hours & visits
Students: Registering for Office Hours with Your Counselor
For Students: Registering for college visits
Scoir mobile app
College Admissions
Staff setup & management
For Colleges: Add & invite admissions staff
For Colleges: Admissions Officer Roles & Permissions
For Colleges: Remove admissions staff
Integrating Slate with Scoir
Introduction: Integrating Slate with Scoir
Step 1: Prepare Slate to Receive Data and Documents from Scoir
Step 2: Connect Slate and Scoir
Step 3: Map Scoir Student Data and Documents in Slate
Troubleshooting Slate integration with Scoir
Colleges: Scoir Audience Integration with Slate
Applications & documents
Application rounds & requirements
Understanding Application Rounds in Scoir
Creating Application Document Requirements
Creating an Application Deadline
For Colleges: Editing, copying, and deleting Application Requirements
Receiving documents
For Colleges: Scoir Index File
For Colleges: Set up a Manual SFTP Connection with Scoir
For Colleges: Troubleshoot configuration of SFTP integration with Scoir
For Colleges: Slate Mapping
For Colleges: Supported Document Types
For Non-Slate Colleges: Configuring File Preferences
For Colleges: Downloading & reviewing documents
For Colleges: Grade Reports
For Colleges: The Scoir CSV/Manifest file
For Colleges: How to access student application documents in Scoir
Managing college profile content
Colleges: Premium Presence Overview
Colleges: How to Use Posts, Events, and Programs in Premium Presence
For Colleges: Events
For Colleges: Guidelines for college profile header photos
Student & guardian messaging
Colleges: Outreach Messaging Overview
Colleges: Sending One-Time Outreach Messages
Colleges: Setting Up Automated Outreach Messages
Find high schools & schedule visits
For Colleges: Explore High Schools & Schedule Visits with Visits+
For Colleges: Getting Started with Visits+ Premium
Colleges: Managing Your Institution's High School Visits
For Colleges: Linking to an external calendar
Student interest & insights
Colleges: Explore your Admissions Insights Dashboard
For Colleges: Applicant Insights & Management
For Colleges: Handraisers Data Access and Delivery
For Colleges: Understanding Scoir Data in Your CRM
Rollover Reset: Your Scoir Checklist
District Administrators
For District Admins: Logging into your Network account
For District Admins: Getting started with a Network account
For District Admins: Adding and managing users in your Network account
For District Admins: Network roles and permissions
For District Admins: District communications
For District Admins: Setting up and enabling Advanced Email features
School Administrators
School account setup: Data requirements
Grades 9-12
Grades 9-12: Scoir data gathering instructions (Naviance & SIS for students, parents, and teachers)
Grades 9-12: Scoir data gathering instructions (Naviance, ClassLink & SIS for parents)
Grades 9-12: Scoir data gathering instructions (Naviance, Clever & SIS for parents)
Grades 9-12: Scoir data gathering instructions (ClassLink & SIS for parents)
Grades 9-12: Scoir data gathering instructions (Clever & SIS for parents)
Grades 9-12: Exporting data from your Student Information System (SIS)
Grades 6-8
Grades 6-8: Exporting data from your Student Information System (SIS)
Grades 6-8: Scoir data gathering instructions for account setup (Clever)
Grades 6-8: Scoir data gathering instructions for account setup (ClassLink)
Grades 6-12
Grades 6-12: Scoir data gathering instructions (ClassLink & SIS for parents)
Grades 6-12: Scoir data gathering instructions (Clever & SIS for parents)
Grades 6-12: Scoir data gathering instructions (Naviance, ClassLink & SIS for parents)
Grades 6-12: Scoir data gathering instructions (Naviance & SIS for students, parents, and teachers)
Grades 6-12: Exporting data from your Student Information System (SIS)
Grades 6-12: Scoir data gathering instructions (Naviance, Clever & SIS for parents)
System-Specific Instructions
School account settings
School Settings Overview
Enable application materials (Documents)
Setting up and enabling Advanced Email
Ensuring Scoir Emails are Delivered
Request a GPA scale change
Set Up Your School Reports Template
Managing Student Transcript Settings
Configuring FERPA Waiver & Release Forms
Configuring Recommendation Settings
School logo and template for teacher recommendations
Student self-reporting for GPA and test scores
Pending Acknowledgement
Predictive Chances and Scattergram display settings
For Counselors: Overriding a college's application document requirements
Can counselors control who sees Balanced List scores?
Can counselors adjust Balanced List minimums?
Can Balanced List Scores be based on just colleges marked as Applying and Applied?
User setup & roles
Users page overview
Adding and removing counselors and other staff to Scoir
Inviting faculty and staff
Understanding and assigning roles and permissions
Inviting Students
Assigning counselors to students
Inviting Parents/Guardians to Join Scoir
Inform students, families, and staff about Scoir with these templates
For Counselors & Staff: Signing In to Scoir & Multi-Factor Authentication
Data uploads
Parents
Account setup & management
Parents/Guardians: Managing your email notifications
For Parents/Guardians: Changing your email address
For Parents & Guardians: Getting to Know Your Dashboard
For Parents: How to create and link your account to your student and their school
For Parents/Guardians: Change your Scoir password
Supporting your students
For Parents/Guardians: View your student’s college list
For Parents: View your student’s college list in a table layout
For Parents/Guardians: Suggesting colleges to your student
For Parents/Guardians: Unsuggesting a college for my student
For Parents/Guardians: View and simulate your student’s Predictive Chances
For Parents: View and manage your student’s Drive
For Parents/Guardians: Digitally signing your student's early decision contract
Parents & Guardians: How to Sign the FERPA Release in Scoir
Searching for colleges
For Parents/Guardians: Search and Suggest Colleges to Your Student
For Parents/Guardians: Viewing Scattergrams
For Parents/Guardians: Comparing colleges
For Parents/Guardians: Financial information & estimates
For Parents/Guardians: Discover Programs
Assignments
Scoir mobile app
Teachers
Product Updates
- Browse by topic
- Counselors
- Document management
- Document preparation & uploading
- For Counselors: Manage Documents
For Counselors: Manage Documents

Manage Documents is where you track application-document status across your senior class — one row per student, with a column for every document. Each cell shows whether a document is missing and, just as important, whether any of the student’s colleges actually require it, so you can prioritize the work that matters.
Reading the table
By default, the Manage tab shows every student in your school’s current senior class — it isn’t filtered to your own caseload automatically. If you only want to see your students, apply the Counselor Assignment filter (see Filtering, columns, and saved views below).
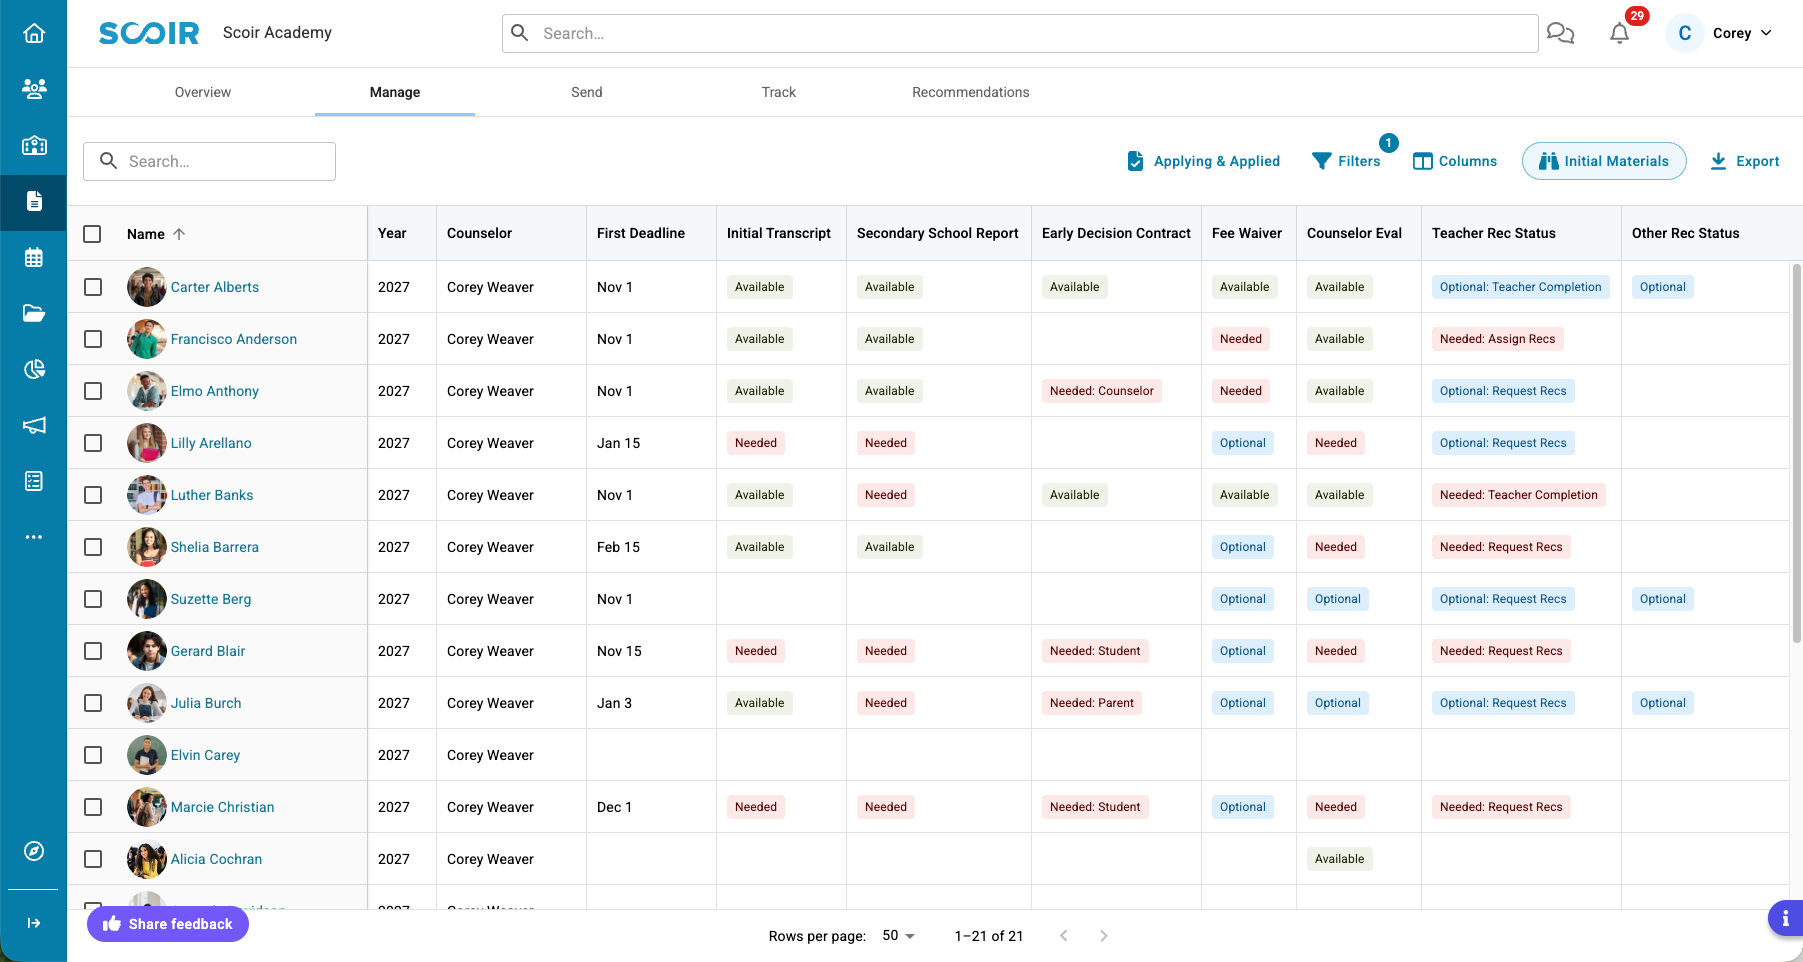
Most document cells show a single Tag:
Tag | Meaning |
Available | The document has been created, uploaded or signed. |
Needed | Missing, and at least one college on the student’s list requires it. |
Optional | Missing, and not required by any colleges on the student's list. |
The Application Status control
Above the table, on the action bar, you’ll find an icon with a document showing a check mark. Click it to open a menu titled Show requirements for, with three options:
- Applying & Applied: The default selection, which surfaces requirements for all active applications.
- Applying Only: Narrows to colleges the student is currently working on, excluding ones they’ve already applied to. This will not include Queued applications that do not have a round selected yet.
- Applied Only: Limits the requirement set to applications that have been submitted.
This isn’t a row filter — it doesn’t hide or show students, and the row count never changes. What it does is change the calculation behind every cell in every row, using each student’s own set of colleges. The selected value will save and be included in any custom views.
Filtering, columns, and saved views
Document columns and filters are organized into six groups that follow the shape of the school year — Student Details, Initial Materials, Teacher & Other Recommendations, Midyear Materials, Final Materials, and Miscellaneous. Views key off these same groups to help you focus on where you are in the year.
Jump to a season with Views
You don’t have to set anything up to get started; three views come built in: Initial Materials, Midyear Materials, and Final Materials. Pick one from the options on the action bar and the table focuses on that group’s columns automatically, so you’re not rebuilding the same setup every time the calendar moves you into a new phase of the cycle.
Show only what you’re working on with Columns
Click Columns to add or remove anything from your view. If you have Additional or Transfer Transcripts, Senior Courses or Grade Report documents, add them to your Initial Materials so it aligns with your school's workflow.
Narrow the list with Filters
Click Filters to cut the table down to a specific set of students. Use Counselor Assignment any time you want to work your own caseload instead of the whole senior class. Below that, the filters break into the same six groups as Columns, so you can filter on exactly the document or status you’re chasing.
The Teacher & Other Recommendations group also has numeric range filters — Outstanding Teacher Recommendations, Available Teacher Recommendations, Declined Teacher Recommendations, Available Other Recommendations, and Ranked Recommendations — for when you want to filter by count instead of status. The count of Ranked Recommendations includes Teacher and Other recs.
Save your View
Once your columns and filters are dialed in save it as a custom view. It’ll sit alongside the three built-in views so you can get back to that exact setup anytime without rebuilding it. Set the view as your default so it shows each time you log in and visit the Manage Documents page.
The Export button sits on the action bar next to the view selector if you need to save a copy of what you’re currently looking at.
Teacher & Other Recommendations
This is the most nuanced part of the table. The Teacher Rec Status and Other Rec Status columns use a similar set of states. Each state tells you not just that something’s outstanding, but exactly what to do next. A student can have applications sitting in more than one of these states at once. The Tag shown reflects whichever state is highest priority until that specific action is resolved, in this order:
Tag | Meaning | Next step |
Needed: Request Recs | The student does not have enough requests to meet the maximum number required by a college. | Request a teacher rec |
Needed: Assign Recs | Requests have been sent but an application has a required rec that isn't assigned yet. | Assign either manually or through ranking |
Needed: Teacher Completion | Requested and assigned, but the rec is required and the teacher hasn’t completed it. | Follow up with the teacher |
Optional: Teacher Completion | Requested and assigned, but the rec is optional and the teacher hasn’t completed it. | Optional — follow up if useful |
Optional: Assign Recs | Requests have been sent but an application has an optional rec available that isn't assigned yet. | Optional — assign if useful |
Optional: Request Recs | An optional recommendation opportunity exists but hasn’t been requested. | Optional — request if useful |
Available | All recommendation spots are requested, assigned and completed by the teacher. | Nothing to do |
Taking action on a document
The Manage tab tells you what needs attention. To work on a specific document for a specific student, click the student’s name to open their profile.
Selecting rows in the table gives you one bulk action: applying labels. Pull up that same label on the Student Roster or the Applications data table to work with the same group of students elsewhere.
Frequently Asked Questions
Where can I see FERPA status or Common App connection status?
Neither is tracked on the Manage tab. You’ll find both on the Student Roster.
When do Midyear and Final Materials show as Needed?
The same way any other column does — if any college on the student’s list requires that document, it shows Needed; if none require it but at least one recommends it, it shows Optional. This is separate from your Send settings for “send midyear/final transcript for applications that are…”, which control when an application shows Needs Attention on the Send tab. The Manage tab’s Needed/Optional status is based purely on what colleges require, regardless of those settings.
Is the table filtered to my own students automatically?
No. By default it shows the whole senior class. Apply the Counselor Assignment filter if you only want to see your own caseload.