Apply with Scoir
Applicant resources
For Students: How to Apply Coalition with Scoir
Transfer & Non-Scoir Students: How many recommendations do I need?
Transfer & Non-Scoir Students: Requesting transcripts, application documents, & recommendations
Transfer & Non-Scoir Students: My recommendation was submitted but the college portal says it’s not received
Transfer & Non-Scoir Students: I added my recommender as "Other" and can't assign their letter to a college
Transfer & Non-Scoir Students: My recommender or school official can’t access their submission link or didn't get an email
Colleges resources
For Colleges: Scoir application activation checklist
For Colleges: Configuring your application
For Colleges: Application activation
For Colleges: Importing School Reference IDs
For Colleges: Testing your application
Recommender & supporter resources
Common App™ in Scoir
For Counselors & School Staff
Common App in Scoir: Start Here for Counselors
Getting Your School Ready for the Common App Integration
Sending Documents to Common App: How It Works
Managing Fee Waivers for Common App
Managing Common App Early Decision (ED) Agreements
Creating Midyear Reports for Common App
Creating Optional Reports for Common App
Creating Final Reports for Common App
Sending Documents for Alumni with the Common App Integration
For Students
Common App in Scoir: Start Here for Students
Connecting Common App & Scoir
How to Sign your FERPA in Common App
Requesting Fee Waivers for Common App
Completing an Early Decision (ED) Agreement for Common App
Using Scoir & Common App if Your School Doesn't Connect Them
Troubleshooting Common App Account Linking
Troubleshooting FERPA Status in Scoir
What Syncs Between Common App & Scoir
Changing a College’s Application Method
Common App System Refresh: What to Expect in Scoir
Counselors
Getting started
Using Scoir: A quick start guide for middle school counselors
For Counselors: Managing your account
Counselor Dashboard Overview
For Counselors/Teachers: Changing your email address
For Counselors: Creating a Demo Student Account
Adding & managing students
For Counselors: Student roster overview
For Counselors: Add a new student
For Counselors: Student registration process
For Counselors: Labels overview
For Counselors: My student has a Scoir account but I can't see their data
For Counselors: Edit student profiles
For Counselors: Student transferring high schools
For Counselors: How to Find and Restore Archived Students
Counselors: Recording Scholarships for Students
For Counselors: Create and manage Saved Views
Managing parents
Why can't parents see Scattergrams, Surveys, and other Scoir features?
For Counselors: Using the Parent Roster
Counselors: Why can’t I add a parent to a student’s account?
College & career planning
For Counselors: Viewing students’ career interests
Counselors: PrinciplesYou character assessment overview
For Counselors: Searching and filtering colleges
For Counselors: Suggesting colleges
For Counselors: Add a college to a student's college list
For Counselors: Manage colleges on behalf of a student
For Counselors: Managing and using Scattergrams
For Counselors: Understanding List Scores
For Counselors: A guide to Predictive Chances with Scoir AI
For Counselors: Guide to Acceptance Likelihood and Intelligent Match
For Counselors: Set student outcomes and post-graduate plans
For Counselors: Applications Overview
For Counselors: Admission Intelligence FAQ
For Counselors: Adding a college that isn't showing up in Scoir
Document management
School Drive & student Drives
Choosing the right way to share resources with students
For Counselors: Using School Drive
For Counselors: View and manage your student's Drive
For Counselors: Bulk add files & links to students' Drives
Document preparation & uploading
Counselors: Create a Secondary School Report for Individual Students
Counselors: Midyear Reports and Transcripts
For Counselors: Final Reports and Transcripts
For Counselors: Grade Reports (Individual)
For Counselors: Application Fee Waivers
For Counselors: Digitally Signing Early Decision Contracts/Agreements
For Counselors: A Guide to Letters of Recommendation in Scoir
Counselors: Complete a counselor evaluation/recommendation
Counselors: Checking the status of teacher recommendation requests
Counselors: Ranking a Student's Recommendations
Assigning Recommendations to Colleges
Counselors: Uploading recommendations on Behalf of Others
For Counselors: Managing FERPA on behalf of a student
Understanding FERPA - Frequently asked questions
For Counselors: Manage Documents
Document sending
Counselors: Bulk Sending Application Documents
For Counselors: Sending Application Documents for Individual Students
For Counselors: Understanding what "Complete Packets Ready to Send" means
For Counselors: Understanding the "Needs Attention" document status
For Counselors: Cancel sent documents - the send docs "undo" button 😮
For Counselors: Resending an updated transcript after it was already sent
For Counselors: Why aren't documents appearing in the list to be sent to colleges?
Tracking & troubleshooting
Plans, Tasks, and Forms
For Counselors: Creating and Managing Assignment Plans
Counselors: Creating and Assigning Forms
Counselors: Creating and Assigning Tasks
For Counselors: Creating, publishing, and editing Surveys
For Counselors: Viewing Survey results
For Counselors: Creating brag sheets in Scoir
Counselors: Scoir-Created Plans Playbook
Uploading test scores & other data
Test Score Imports: ACT score imports
Test Score Imports: ACT and PreACT scores via rapid manual entry
Uploading College Board test scores
For Counselors: Importing Custom Properties
Bulk add/update Grade Report
Bulk add/update Senior Courses
Bulk add/update Student GPAs
Bulk add/update Transcripts
Reporting
For Counselors: Running reports on student data
For Counselors: Custom Properties and Property Groups
Communication & notifications
For Counselors: Messaging students & parents in Scoir
For Counselors: The Email Center
For Counselors: Sending and scheduling emails
For Counselors: Emailing users using the advanced email integration
For Counselors: Scoir Library & Email Subscription management
For Counselors: What notifications will students receive from Scoir?
For Counselors: Notifications & alerts
Calendar & scheduling
Using the calendar
For Counselors: Calendar overview
For Counselors: Linking your Scoir calendar to an external calendar
Visits & office hours
For Counselors: Scheduling in-person visits & availability
For Counselors: Scheduling virtual visits
For Counselors: Scheduling visits for non-college organizations
For Counselors: Scheduling multiple college visits within the same time slot
For Counselors: Students' notification of college visits
For Counselors: Understanding Scoir RSVP dates
For Counselors: Scheduling office hours
For Counselors: Office hours from the student perspective
For Counselors: Edit or delete a visit
For Counselors: Register and Unregister Students for Visits and Office Hours
Resources & checklists
Students
Account setup & management
Students: Getting Started with Your Scoir Dashboard
For Students: Creating an account when invited by your high school
For Students: Creating an account on your own (non-Scoir high school student account)
For Students: How to tell if you are linked to a high school or not
For Students: Invite a parent or guardian to Scoir
For Students: What to do if you have multiple accounts
Students: Link your existing Scoir account to a high school
Students: How to Add an Alternate Email or Change Your Primary Email
For Students: Delete your account
Build your student profile
For Students: Updating Your Personal Information in Scoir
For Students: First generation students
Students: How to Access and Sign Your FERPA in Scoir
For Students: Edit Your Academic Info (School, GPA, and Test Scores)
For Students: Record Your Activities and Achievements
For Students: Create and Export a Resume in Scoir
For Students: Using your Drive
Explore careers
For Students: Taking a career interest assessment
For Students: Taking the PrinciplesYou character assessment
For Students: Discover careers
For Students: Managing careers in your profile
For Students & Parents: Access College Guidance Network with single sign-on (SSO)
College planning
Explore colleges
For Students: Setting your college preferences
For Students: Student interest categories
For Students: Discover colleges
For Students: College profiles
For Students: Comparing colleges
For Students: Viewing Scattergrams
For Students: Discover Events
For Students: Discover Programs
Build & manage your college list
For Students: Understanding what it means to follow a college in Scoir
For Students: My Colleges
For Students: View your college list in a table layout
For Students & Parents: Create and Manage Views
The Balanced List Score
For Students: View & simulate your Predictive Chances for college admissions
For Students: Updating outcomes and post graduate plans
Application documents & resources
For Students: Understanding Test Optional, Test Free & Test Required SAT/ACT Scores
Students: Requesting Application Fee Waivers in Scoir
For Students: Early Decision Contracts in Scoir
For Scoir connected students: Requesting transcripts
Students: Requesting Teacher Recommendations if Your School Uses Scoir
For Students: Checklist for ensuring application document delivery
For Students: How to Request and Rank Recommendations
Assignments
Office hours & visits
Students: Registering for Office Hours with Your Counselor
For Students: Registering for college visits
Scoir mobile app
College Admissions
Staff setup & management
For Colleges: Add & invite admissions staff
For Colleges: Admissions Officer Roles & Permissions
For Colleges: Remove admissions staff
Integrating Slate with Scoir
Introduction: Integrating Slate with Scoir
Step 1: Prepare Slate to Receive Data and Documents from Scoir
Step 2: Connect Slate and Scoir
Step 3: Map Scoir Student Data and Documents in Slate
Troubleshooting Slate integration with Scoir
Colleges: Scoir Audience Integration with Slate
Applications & documents
Application rounds & requirements
Understanding Application Rounds in Scoir
Creating Application Document Requirements
Creating an Application Deadline
For Colleges: Editing, copying, and deleting Application Requirements
Receiving documents
For Colleges: Scoir Index File
For Colleges: Set up a Manual SFTP Connection with Scoir
For Colleges: Troubleshoot configuration of SFTP integration with Scoir
For Colleges: Slate Mapping
For Colleges: Supported Document Types
For Non-Slate Colleges: Configuring File Preferences
For Colleges: Downloading & reviewing documents
For Colleges: Grade Reports
For Colleges: The Scoir CSV/Manifest file
For Colleges: How to access student application documents in Scoir
Managing college profile content
Colleges: Premium Presence Overview
Colleges: How to Use Posts, Events, and Programs in Premium Presence
For Colleges: Events
For Colleges: Guidelines for college profile header photos
Student & guardian messaging
Colleges: Outreach Messaging Overview
Colleges: Sending One-Time Outreach Messages
Colleges: Setting Up Automated Outreach Messages
Find high schools & schedule visits
For Colleges: Explore High Schools & Schedule Visits with Visits+
For Colleges: Getting Started with Visits+ Premium
Colleges: Managing Your Institution's High School Visits
For Colleges: Linking to an external calendar
Student interest & insights
Colleges: Explore your Admissions Insights Dashboard
For Colleges: Applicant Insights & Management
For Colleges: Student Handraisers Data Access and Delivery
For Colleges: Understanding Scoir Data in Your CRM
For Colleges: Parent Handraisers Data Access and Delivery
Rollover Reset: Your Scoir Checklist
District Administrators
For District Admins: Logging into your Network account
For District Admins: Getting started with a Network account
For District Admins: Adding and managing users in your Network account
For District Admins: Network roles and permissions
For District Admins: District communications
For District Admins: Setting up and enabling Advanced Email features
School Administrators
School account setup: Data requirements
Grades 9-12
Grades 9-12: Scoir data gathering instructions (Naviance & SIS for students, parents, and teachers)
Grades 9-12: Scoir data gathering instructions (Naviance, ClassLink & SIS for parents)
Grades 9-12: Scoir data gathering instructions (Naviance, Clever & SIS for parents)
Grades 9-12: Scoir data gathering instructions (ClassLink & SIS for parents)
Grades 9-12: Scoir data gathering instructions (Clever & SIS for parents)
Grades 9-12: Exporting data from your Student Information System (SIS)
Grades 6-8
Grades 6-8: Exporting data from your Student Information System (SIS)
Grades 6-8: Scoir data gathering instructions for account setup (Clever)
Grades 6-8: Scoir data gathering instructions for account setup (ClassLink)
Grades 6-12
Grades 6-12: Scoir data gathering instructions (ClassLink & SIS for parents)
Grades 6-12: Scoir data gathering instructions (Clever & SIS for parents)
Grades 6-12: Scoir data gathering instructions (Naviance, ClassLink & SIS for parents)
Grades 6-12: Scoir data gathering instructions (Naviance & SIS for students, parents, and teachers)
Grades 6-12: Exporting data from your Student Information System (SIS)
Grades 6-12: Scoir data gathering instructions (Naviance, Clever & SIS for parents)
System-Specific Instructions
School account settings
School Settings Overview
Enable application materials (Documents)
Setting up and enabling Advanced Email
Ensuring Scoir Emails are Delivered
Request a GPA scale change
Set Up Your School Reports Template
Managing Student Transcript Settings
Configuring FERPA Waiver & Release Forms
Configuring Recommendation Settings
School logo and template for teacher recommendations
Student self-reporting for GPA and test scores
Pending Acknowledgement
Predictive Chances and Scattergram display settings
For Counselors: Overriding a college's application document requirements
Can counselors control who sees Balanced List scores?
Can counselors adjust Balanced List minimums?
Can Balanced List Scores be based on just colleges marked as Applying and Applied?
User setup & roles
Users page overview
Adding and removing counselors and other staff to Scoir
Inviting faculty and staff
Understanding and assigning roles and permissions
Inviting Students
Assigning counselors to students
Inviting Parents/Guardians to Join Scoir
Inform students, families, and staff about Scoir with these templates
For Counselors & Staff: Signing In to Scoir & Multi-Factor Authentication
Data uploads
Parents
Account setup & management
Parents/Guardians: Managing your email notifications
For Parents/Guardians: Changing your email address
For Parents & Guardians: Getting to Know Your Dashboard
For Parents: How to create and link your account to your student and their school
For Parents/Guardians: Change your Scoir password
Supporting your students
For Parents/Guardians: View your student’s college list
For Parents: View your student’s college list in a table layout
For Parents/Guardians: Suggesting colleges and sharing your contact information
For Parents/Guardians: Unsuggesting a college for my student
For Parents/Guardians: View and simulate your student’s Predictive Chances
For Parents: View and manage your student’s Drive
For Parents/Guardians: Digitally signing your student's early decision contract
Parents & Guardians: How to Sign the FERPA Release in Scoir
Searching for colleges
For Parents/Guardians: Search and Suggest Colleges to Your Student
For Parents/Guardians: Viewing Scattergrams
For Parents/Guardians: Comparing colleges
For Parents/Guardians: Financial information & estimates
For Parents/Guardians: Discover Programs
Assignments
Scoir mobile app
Teachers
Product Updates
- Browse by topic
- Apply with Scoir
- Colleges resources
- For Colleges: Application activation
For Colleges: Application activation

Colleges will need to link Scoir with their Slate instance in order to receive applications. This article will walk you through the process of testing that connection to enable application delivery, as well as how you’ll confirm you’ve finished testing your application configuration and are ready to launch.
Step 1: Test Application Initiation
This step carries over between cycles, but it's worth confirming your source format status before proceeding.
You are required to have both the CoalitionApplicationProfile source format and supplement form active in Slate prior to launch. Due to the unique nature of our application integration, the existence of the active source format, including the remap active status, is critical. An inactive source format will result in applicants getting stuck between Part 1 of the app and your supplement form.
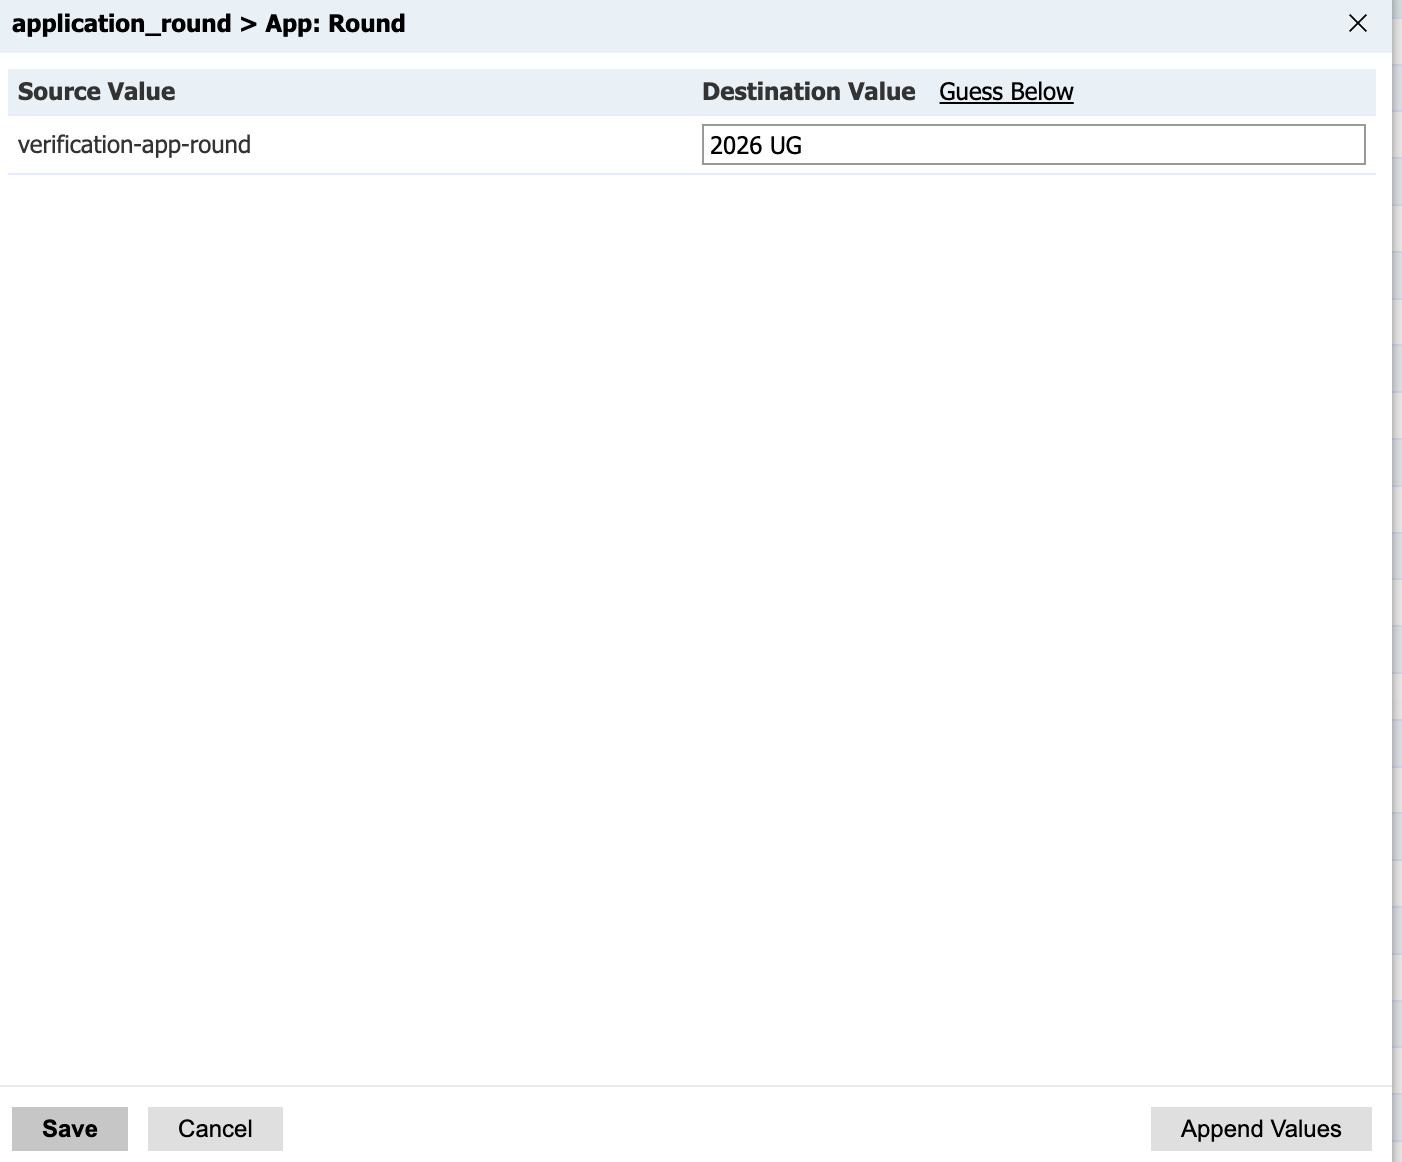
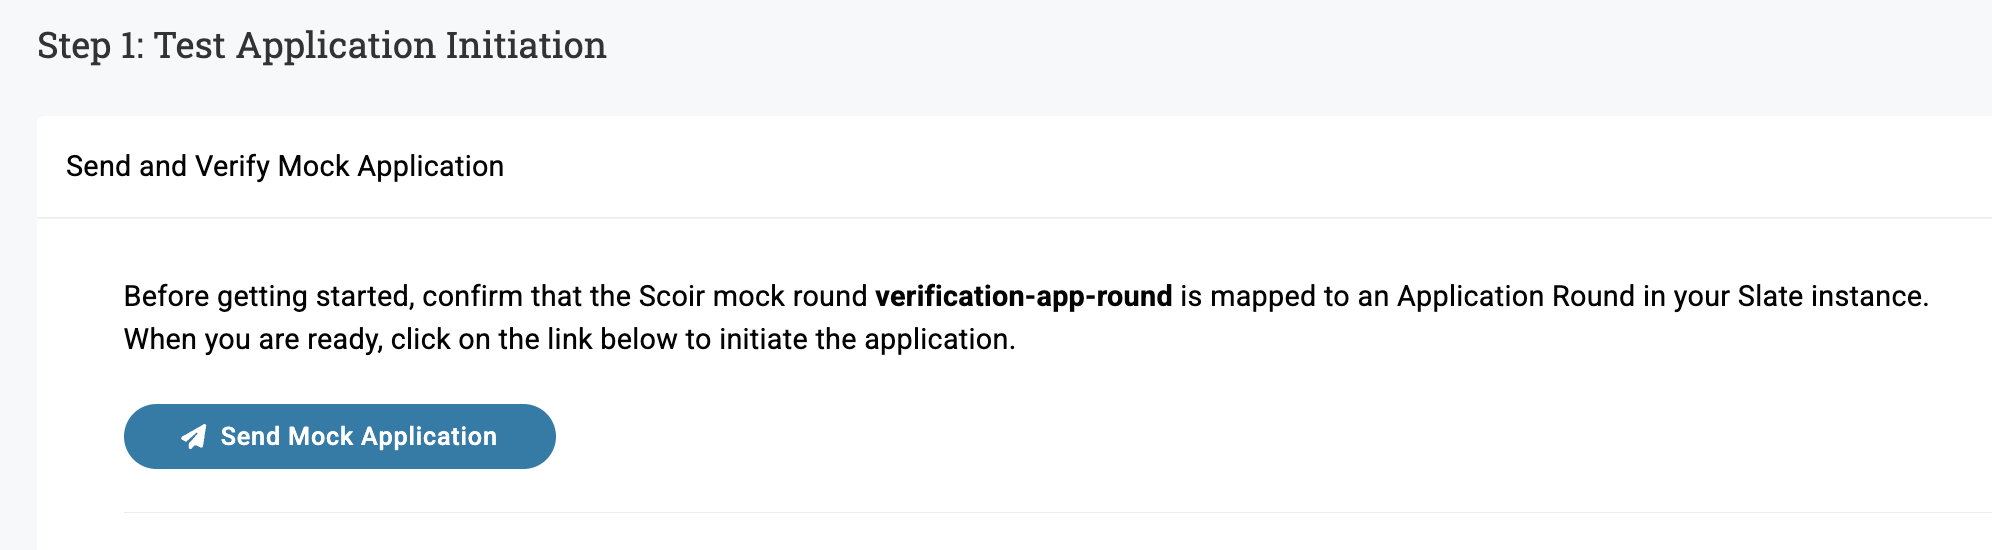
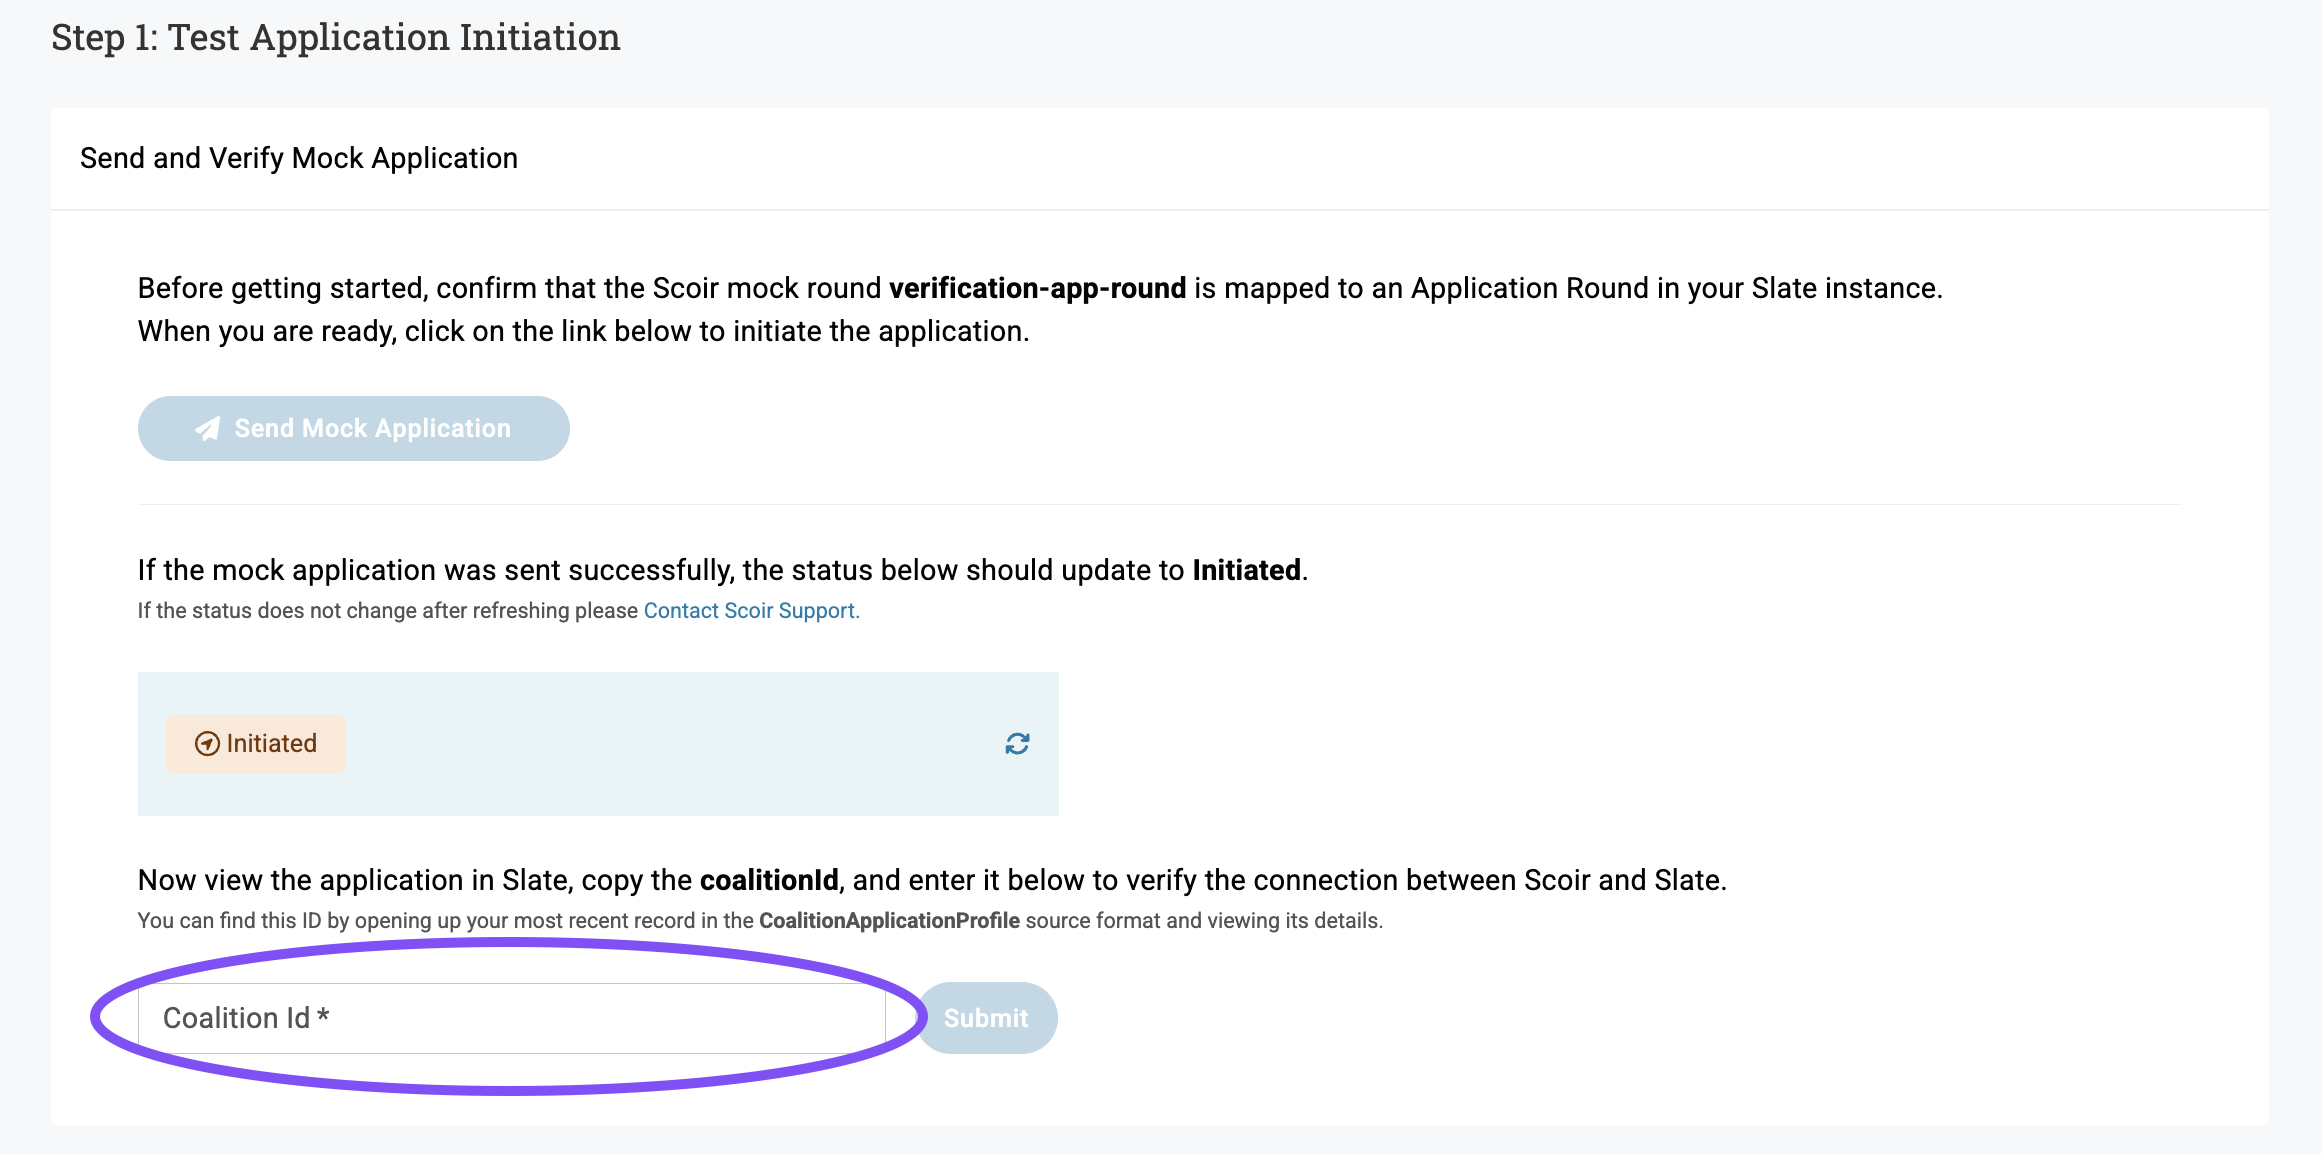
To test the connection between Slate and Scoir, you will send a mock test application to your Slate instance and confirm that the application status returns to Scoir as intended. The Scoir verification-app-round must be mapped in Slate before performing this step.
Map verification-app-round
In the CoalitionApplicationProfile source format, navigate to Prompt Value Mappings, refresh values, and click on the application_round source field.

You can map this round to any Application Round in your instance of Slate. Click Save.
Send Mock Application
After you've mapped the verification-app-round to one of your Application Rounds in Slate, you're ready to send a mock application to test the connection between systems. To send a mock application, click the Send Mock Application button.
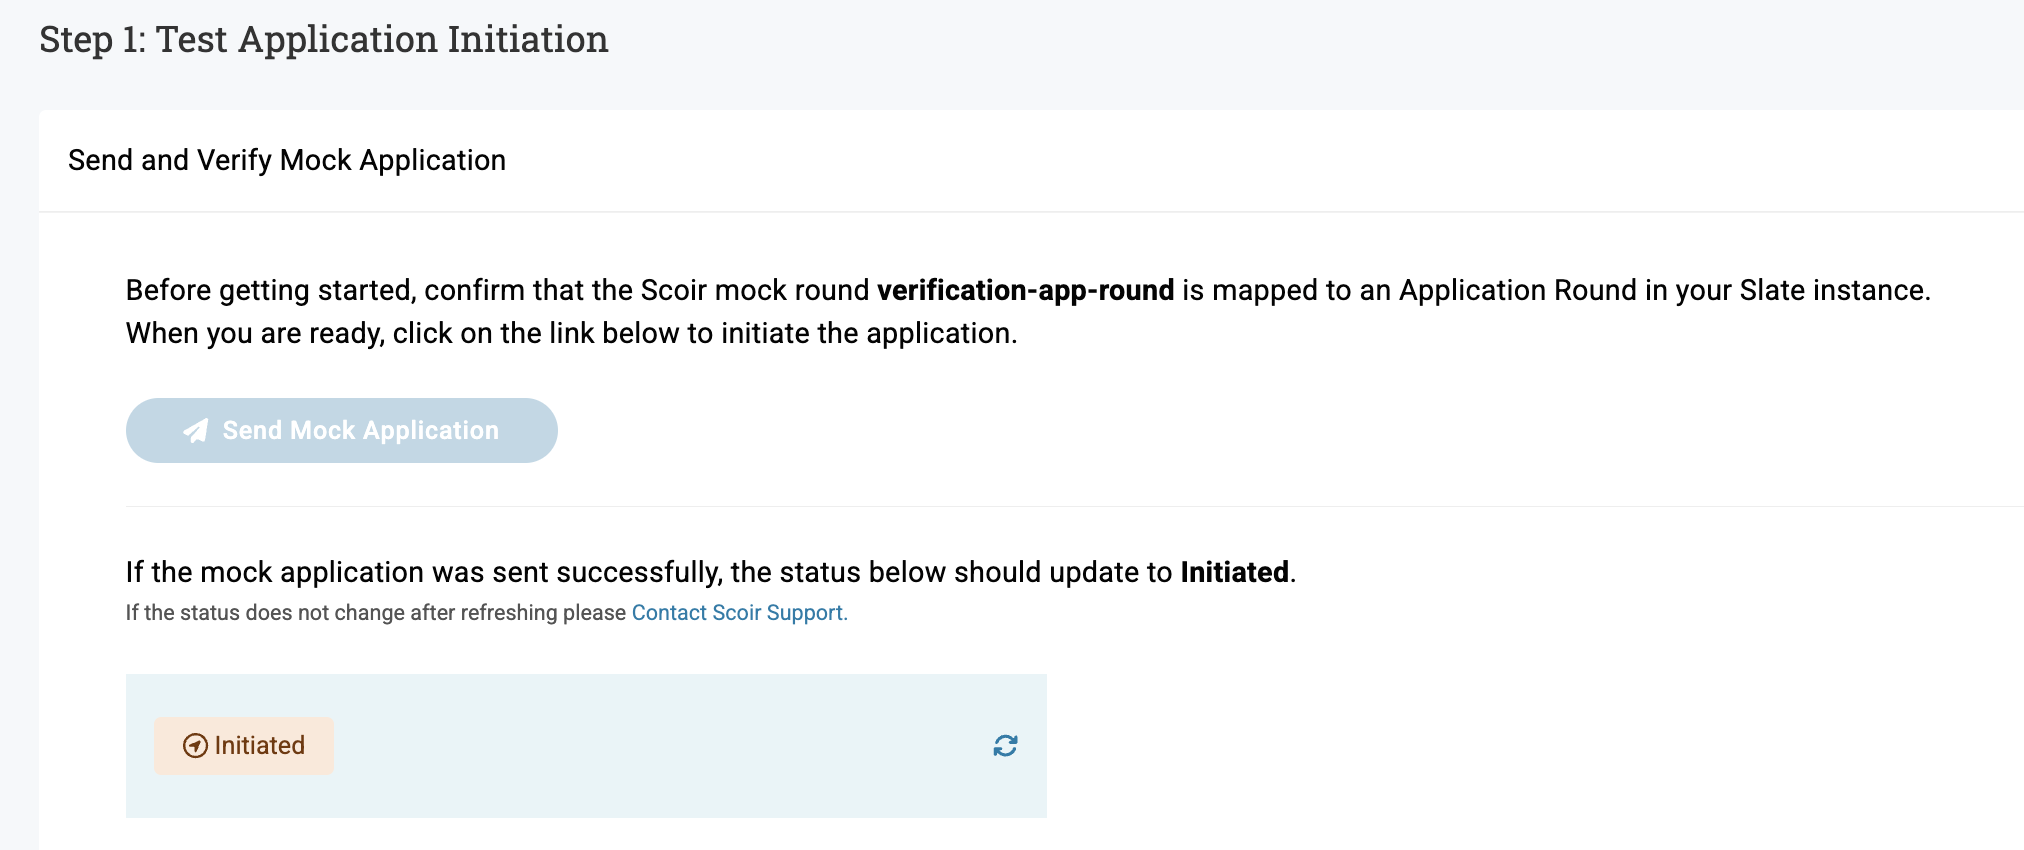
Sending the mock application initializes the status. An Initiated status confirms the application was successfully sent from Scoir to Slate.
The next step is to verify data has been sent to the correct Slate instance for your institution. You'll do this by entering the Coalition Application ID of the mock application in the space provided here.

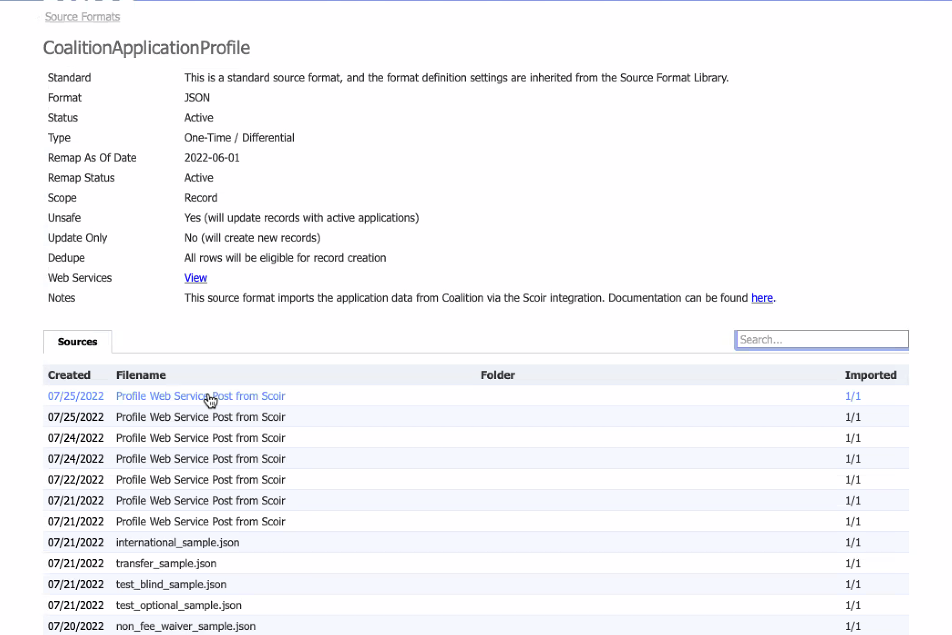
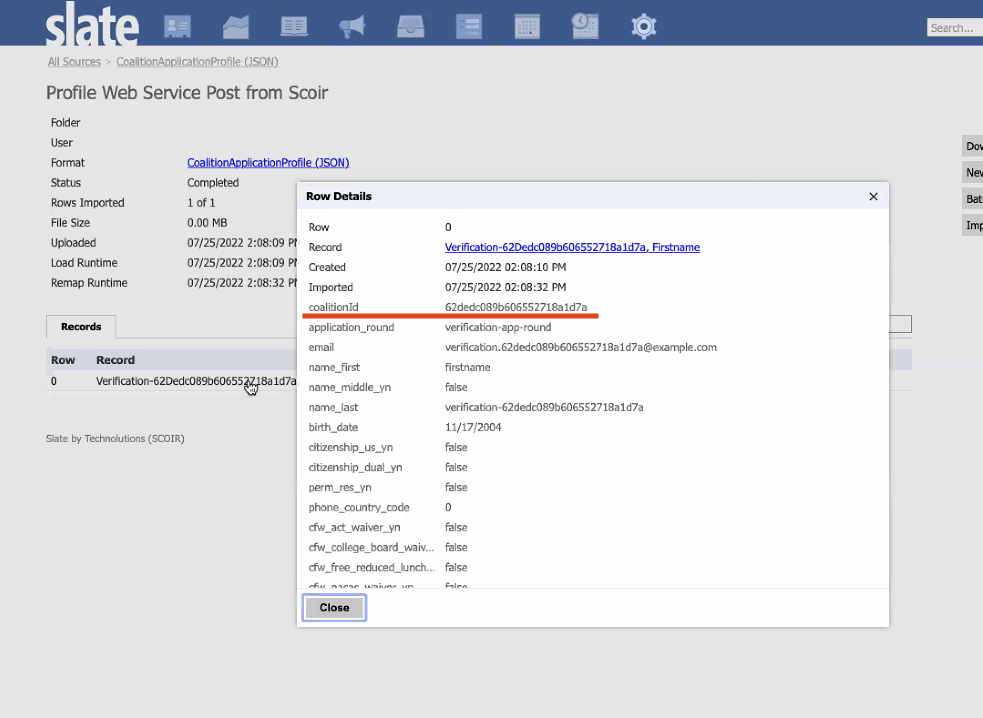
Locate the Coalition Application ID for the mock application by navigating to the CoalitionApplicationProfile source format and clicking on the most recent record to show Row Details.
Copy the coalitionId.
Return to Scoir and paste that copied Coalition ID from Slate into Scoir.
After submitting, a green checkmark confirms that the Coalition ID from your Slate instance matches what Scoir has on record for your mock application.

Step 2: Test Application Submission (test your supplement form)
This is where you will test the submission of your supplement.
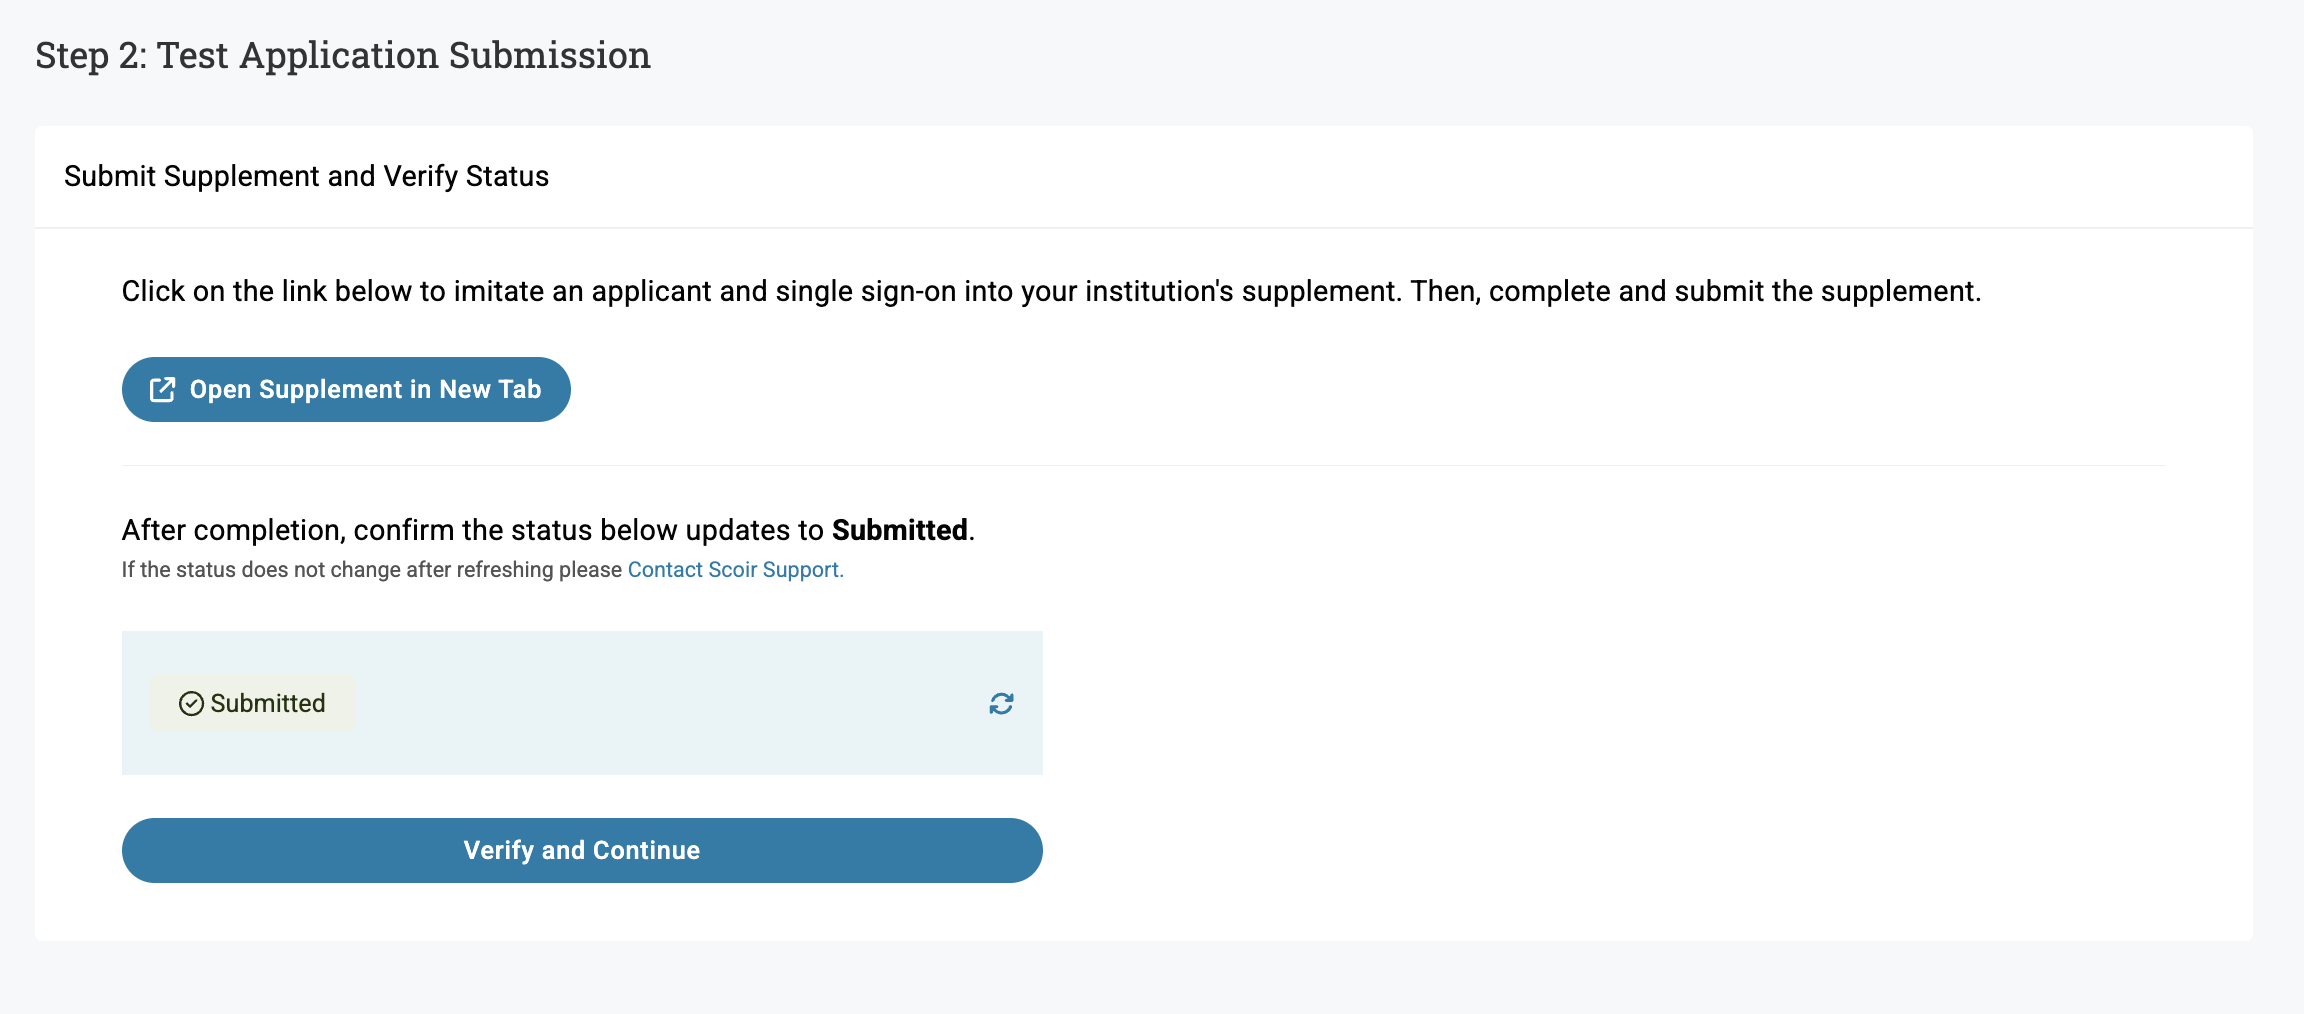
Click the Open Supplement in New Tab button to be taken to Slate to review and submit your college’s supplement form. This will SSO the user into Slate.
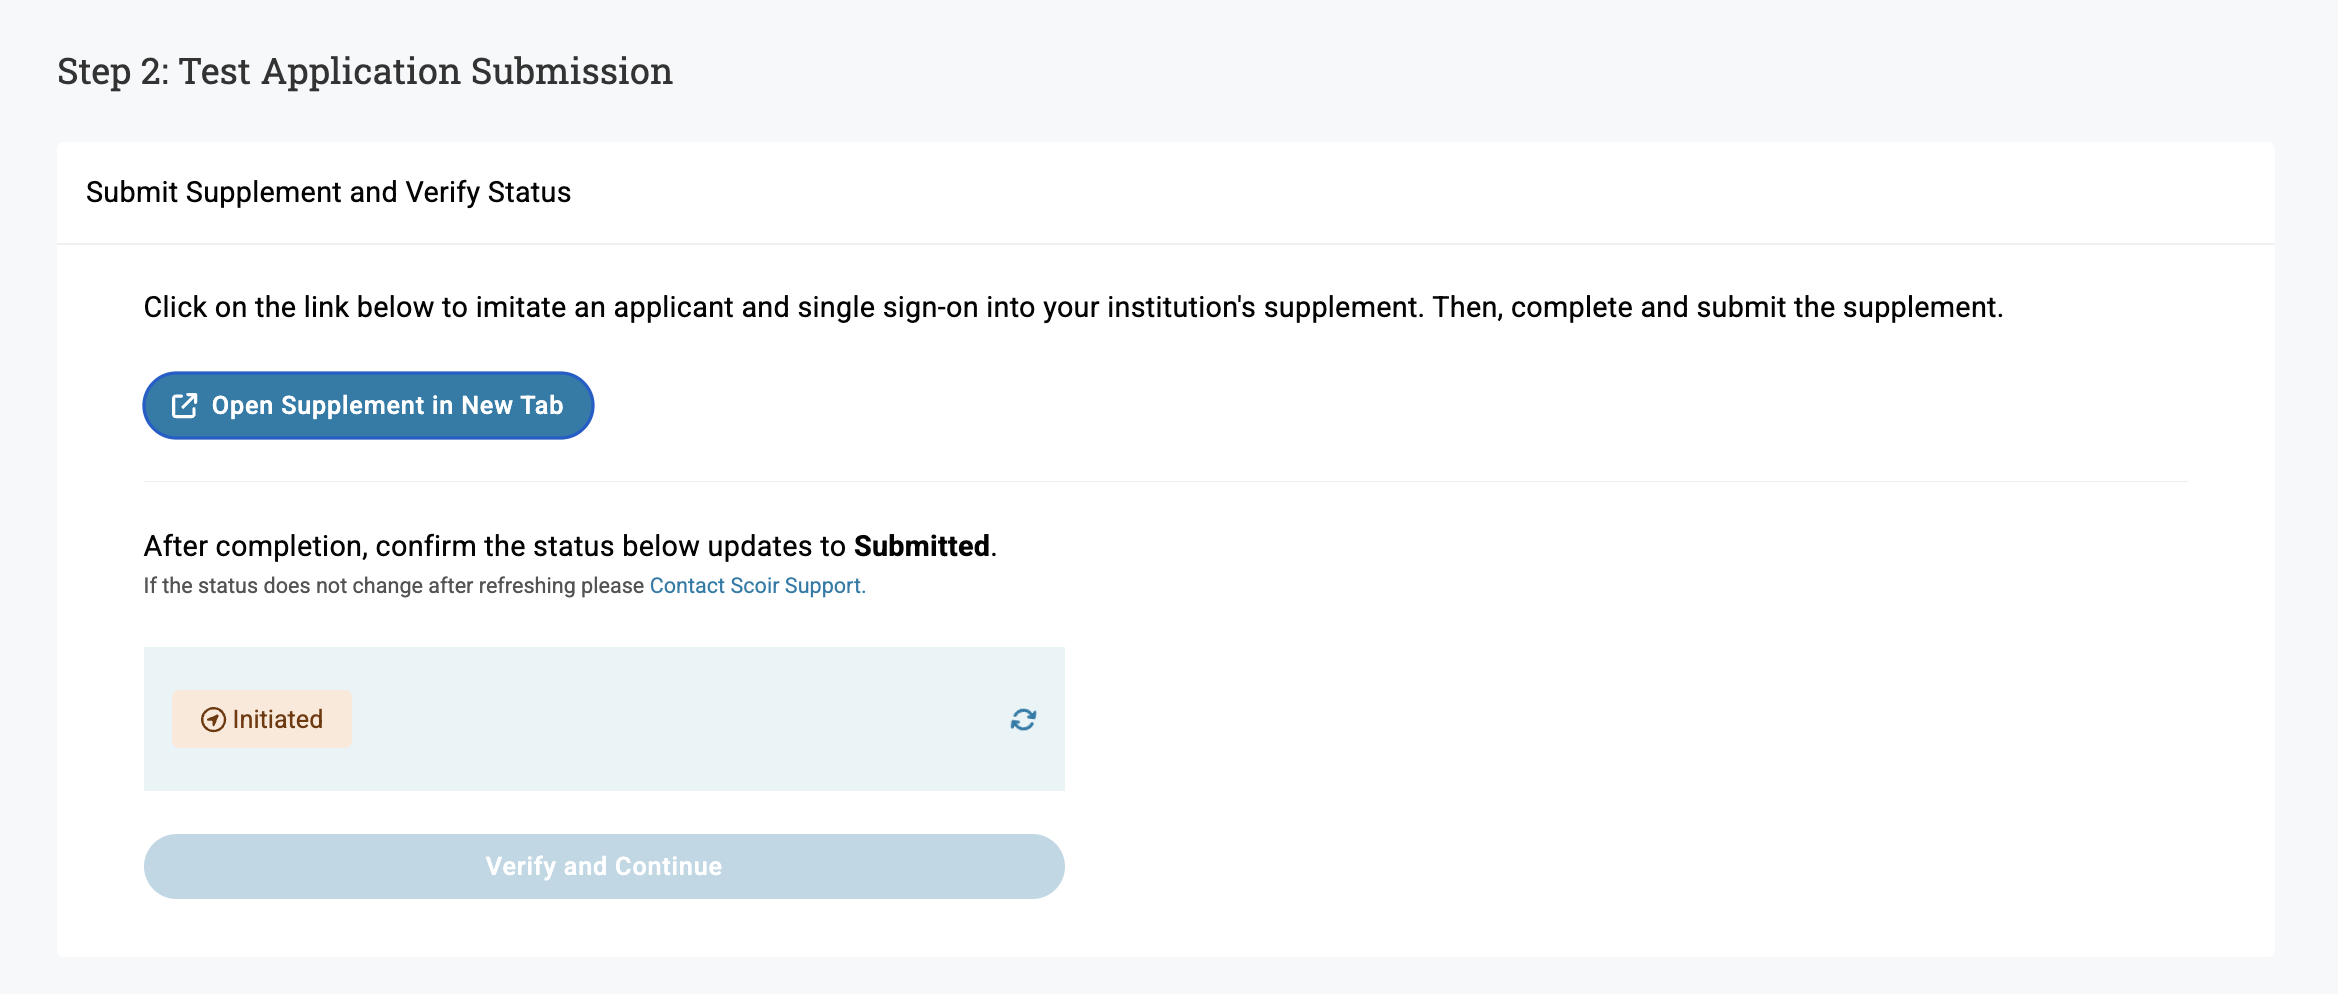
Be sure to complete all the necessary information on your supplement form as required by your institution, verify that all form logic displays as intended, and confirm your application fee payment process is in place (if applicable). When you’re finished, click Submit to proceed.
Once this is complete, the status in Scoir should reflect as 'submitted'. Click Verify and Continue to confirm your supplement form is tested and ready to go.
Step 3: Confirm Application Configuration
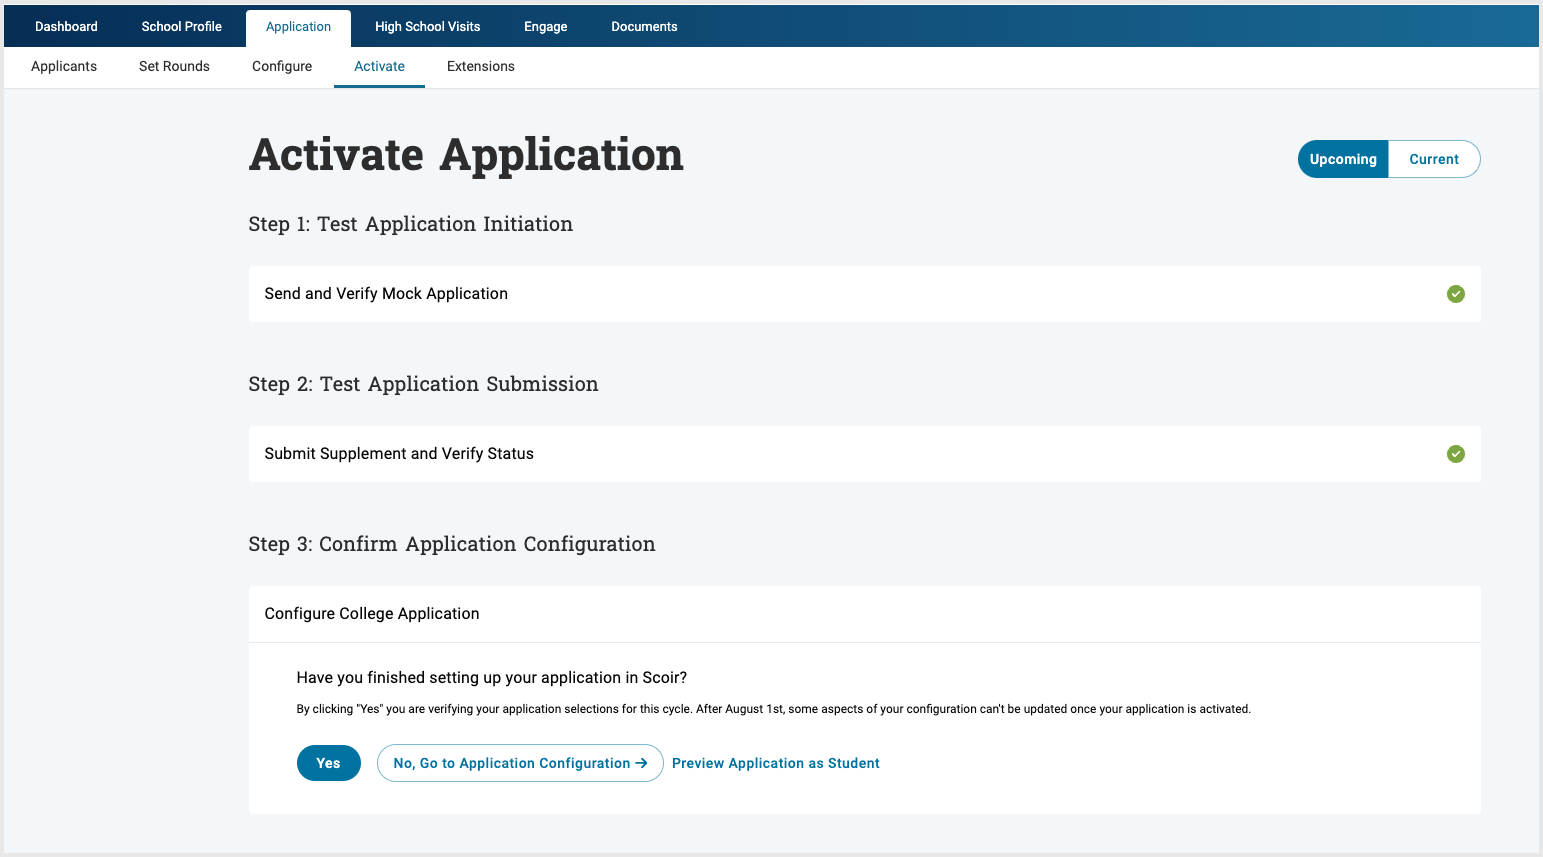
The next step will ask you to confirm that you have completed the Application Configuration in Scoir for your institution in the Application Tab under Configure. Your configuration must be completed to proceed in activating your application. You will not be able to make changes to your configuration for this cycle once you have activated your application and the application is made available to students.
This step is your first opportunity to test the application from a student's perspective. Click Preview Application as Student to walk through the full experience. This option remains available throughout the remaining activation steps and after the application is activated.
Once you’ve confirmed your application configuration is complete, click Yes to continue.
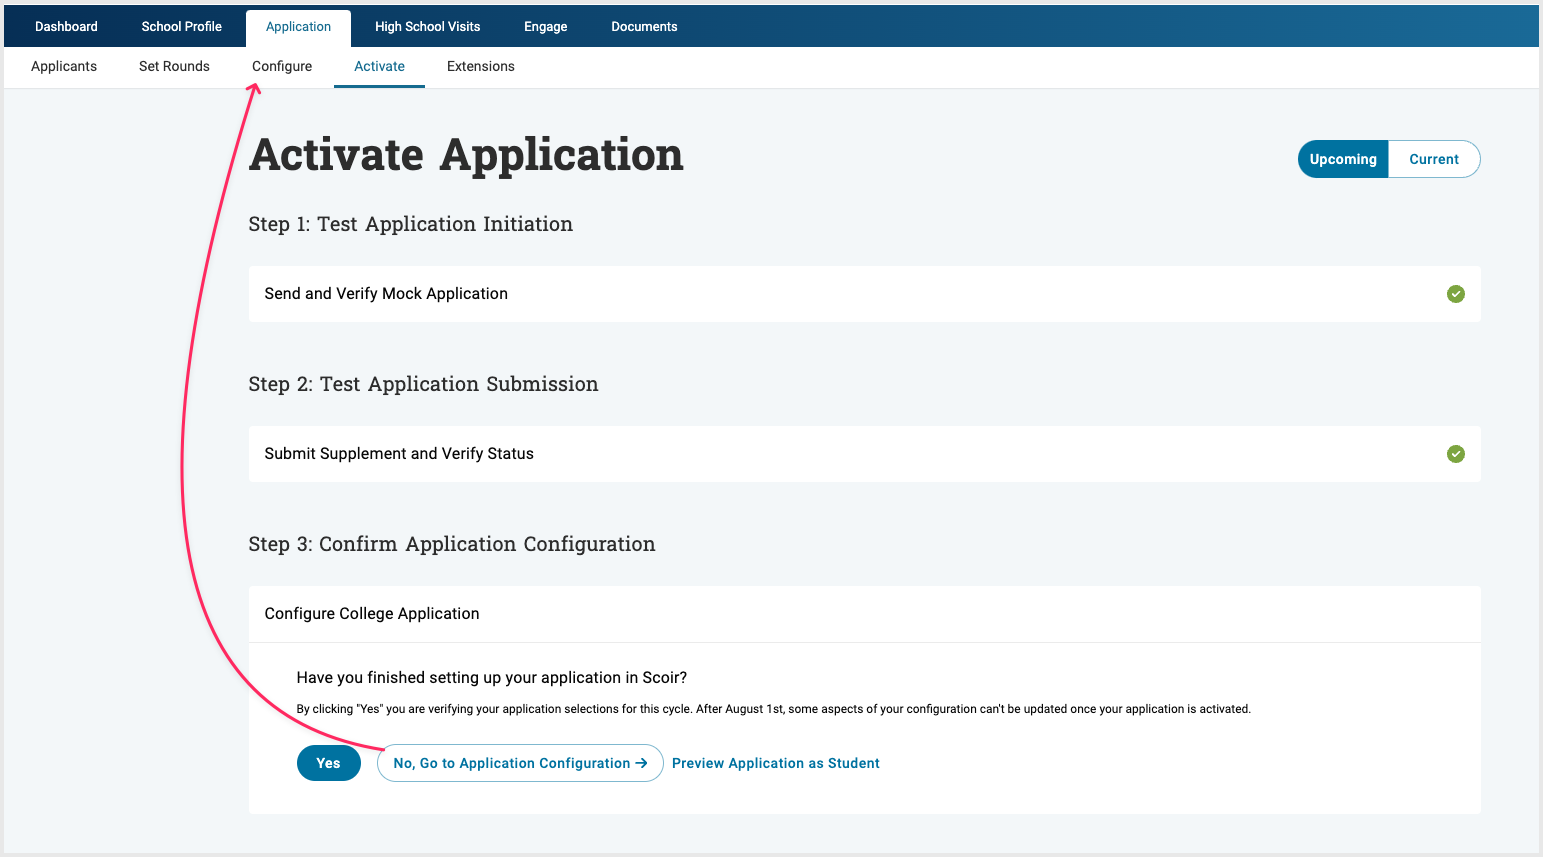
If you're configuration is not complete, selecting No, go to Application Configuration will take you to the Configure tab in Scoir to complete it before proceeding.
Once your configuration is complete, click Yes to proceed to the next step.
Step 4: Confirm Application Rounds
The next step asks you to confirm whether you have finished setting up your Application Rounds in Scoir, and that all Scoir Rounds have been mapped to Application Rounds in Slate. Application Rounds are how we collect application deadlines and requirements. You may set up as many rounds as you need. If you are receiving both First-Year and Transfer applications in Scoir, you will need to have at least one round for each applicant type. All deadlines correspond to 11:59pm UTC on the date selected.
If you have completed this click Yes to continue. If any rounds are not correctly mapped to Slate, an error message will display those rounds. You cannot continue until the mapping issues are resolved.
Click on Preview Application as Student to test your application from a student's perspective.
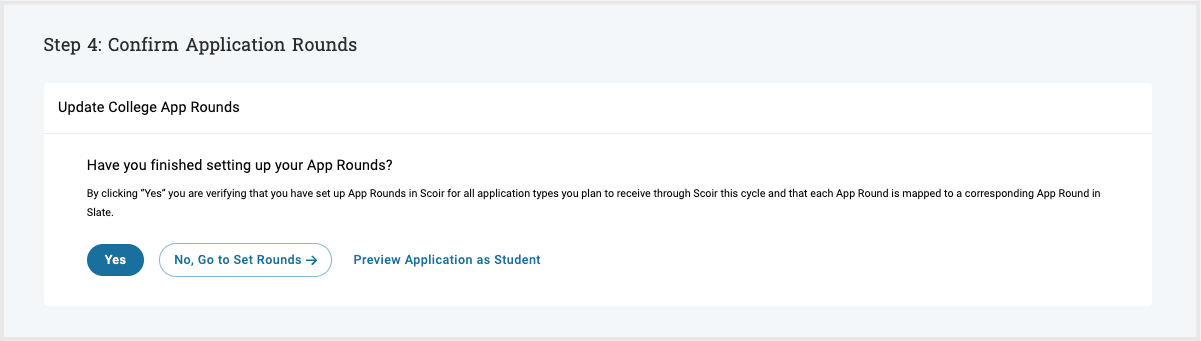
If you have not completed this or still wish to make updates, selecting No, Go to Set Rounds will take you to the Configure tab in Scoir to complete it before proceeding. If you are seeing a Slate round mapping validation error, review the Application Round Considerations section of this Slate Knowledge Base Article.
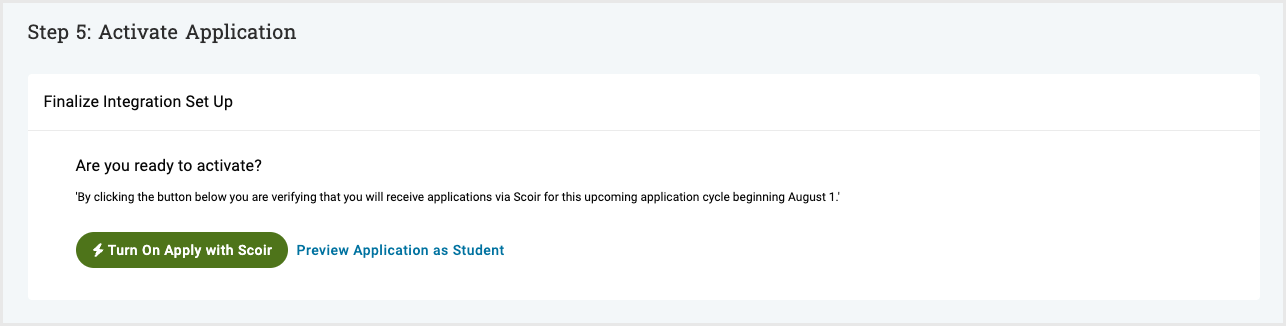
Step 5: Activate Application
If you have completed all of the steps above, you are ready to activate your application. Take a moment to preview your application, ensuring everything is just as you want it.
Once you're all set, click Turn on Apply with Scoir to activate your application.
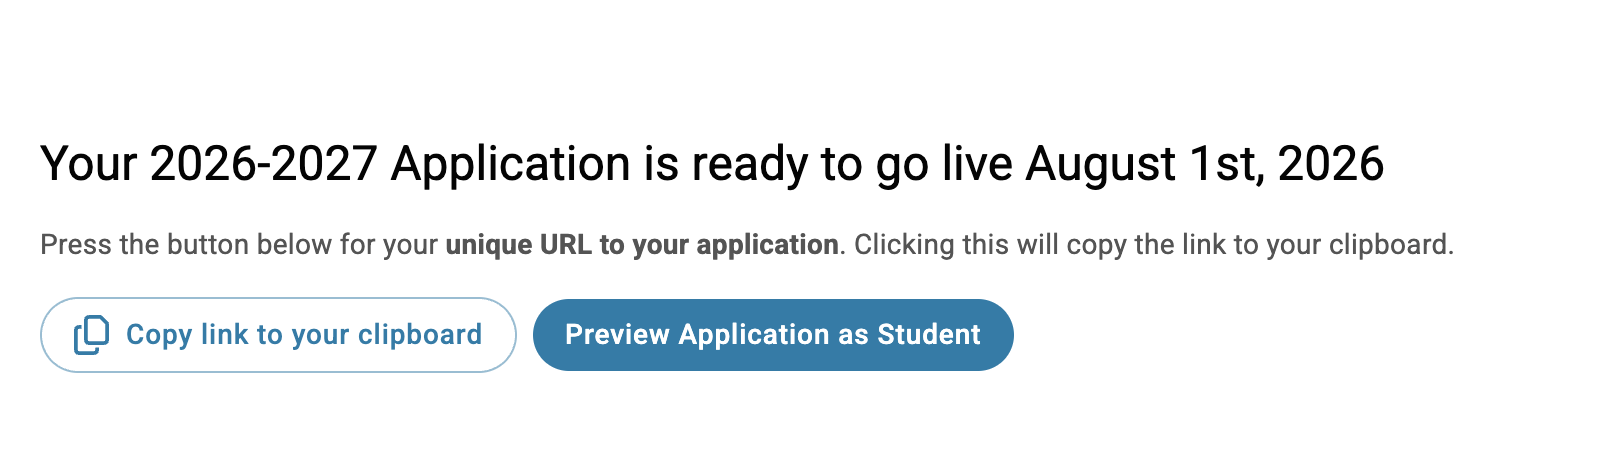
Students will be able to initiate the application process beginning August 1 in the Fall of the start of the application cycle. If you would like to begin receiving applications at a later date, please do not activate your application until that time.
Once you have successfully activated your application, your unique access link to the application experience to share with students will be available here. Use this unique link to direct students right to your application on Scoir.